
Curling or warping of prints is usually caused by poor adhesion at the beginning of a print. Even if the first layers of a print appear to be sticking well to the build plate, layers that aren’t firmly pressed down against the build surface may begin to curl over time.
Keep in mind that prints with a larger base or a longer build time will be more likely to curl. Increased infill may also increase the odds of curling for a print. Additionally, printing in a colder or draftier environment can cause printing issues as well.
It’s best to watch the first few layers to ensure that there aren’t any adhesion issues early on in your prints. The first few layers should have solid, flat lines adhering to the build plate perfectly after an initial purge line. If the first layers of your print appear to be somewhat raised or squiggly, this can lead to curling or warping later on in the print. If this is the case, try to following suggestions.
CLEAN THE BUILD PLATE
Ensure that the build plate is clean. Dust and oil from your hands can prevent objects from sticking. Using a lint-free cloth, wipe down the build plate with rubbing alcohol or 60% isopropyl rubbing alcohol to remove any dust, filament or oil that may have collected
If you are still experiencing the same symptoms, try the following steps:
ADJUST THE Z-AXIS OFFSET
We recommend always printing with a raft. Printing with a raft will provide a consistent build surface that even tricky prints will stick to.
If you are still experiencing issues, it’s possible the Z offset between your build plate and extruder is a bit too much. This distance should be close enough so that the extruder’s nozzle can deposit plastic firmly onto the build platform. If it is too far, the filament extruded will not adhere well. The first layer of filament should sit nicely on the build platform with each resulting layer seated nicely on top of the previous layer.
Adjust your Z axis offset through the following steps below.
On your Replicator+ :
-
Navigate to the Printer Panel and select Settings.
-
Select Utilities.
-
Select Calibration.
-
Select Z Calibrate Offset. It will prompt you to unload filament if you have not already done so.
Please keep in mind that each time you attach a new Smart Extruder+, you will need to run the Z-Axis Calibration routine.
Try a test print. If you’re still experiencing issues, you can manually adjust the Z-axis offset on the Print or Mobile application directly. To do this, make sure you are connected to your printer through a USB or network connection (WiFi or Ethernet).
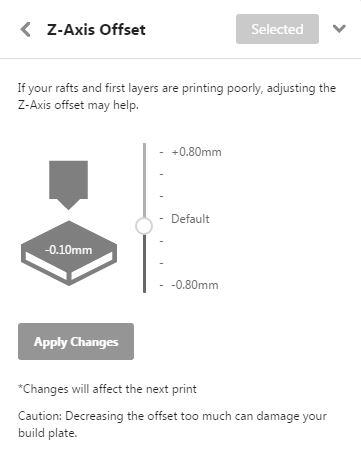
Using MakerBot Print:
-
Open MakerBot Print and select your printer from the bottom right-hand side of the screen.
-
Select Utilities.
-
Select Calibration
-
Select Z-axis offset. Adjust this by only -0.10mm (closer) at a time, moving the extruder closer to the build plate, and choose to Apply.
-
Try the print again and see if the Z offset has to be readjusted. Please note that you may have to do this a few times to get to the ideal distance between the nozzle and the build plate.
If you have a larger print and continue to see curling, we suggesting the use of helper disks to help anchor the prints to your build plate.
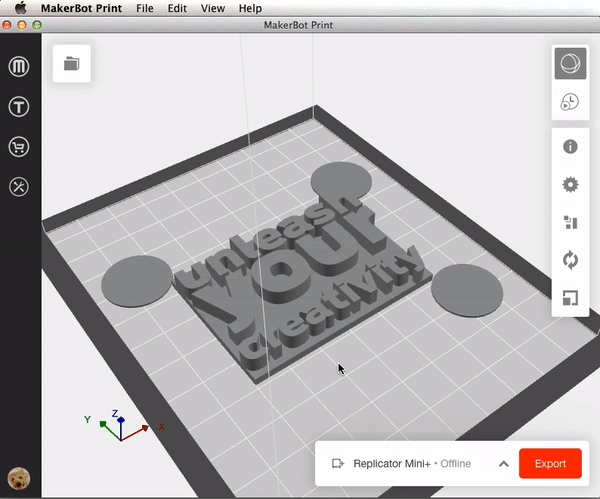
- Go to File and select Insert Example Prints.
- There are two different sized Helper Disks, large and small. Select the helper disk you want to add to the build plate. If you can’t find the disks in the example files, you may not be using the most recent version of MakerBot Print.
- The Helper Disk will appear to the side of your model. If you don’t see the Helper Disk, move your model to the side to reveal the disk. To do this, click on your model, and drag the model away from the center.
- When your model is back in place, drag the Helper Disk to the corner of your model, so the disk just slightly overlaps with the corner of the model.
- You need Helper Disks for each corner of your model. Select the Helper Disk to copy and paste more disks. You can copy and paste using the Edit menu or keyboard shortcuts.
- Slice and print your model by clicking the Print or Export button. The MakerBot Slicer will treat the disks as part of your model.
- Once the print is finished, the disks can be peeled or cut away easily.